Labels

12.11.2013

ADDING SLEEVES (FROM SLEEVELESS)


Some of you may remember the Botanica Medallion Cardi from Vogue Knitting Spring-Summer 2009. No? The fabulous cardi looked like this . I think there’s a reason why it’s being called medallion. It does a medallion. I still love it until today.
As the time goes by, I think I need this cardi with sleeves more than sleeveless, and because it’s been years since I knit my medaliion, I need to make sure that I still have enough yarn to do my project : adding sleeves, so what I did first was digging my stash. So if you have enough yarns, know how to pick up and knit, and also working short rows, this project is ready to go!

10.23.2013

CABLE-RIB CARDI

Whooo hoooo....
It's finally done! This is the loongeest project I've ever encountered. LOL. This one ordered by my friend, few months ago (yes months ago!) she sent me a picture and she said she want me to knit something like this:
The image isn't clear enough for me to see the details. Actually, the picture next to this, which is originally attached,(I already cropped it, sorry) showed similar shape with different color and clearer cable pattern. Just simple repetitive cable. But it looks slightly different. (Oh God, should I believe my eyes?) And I don't see armhole seam at the other picture.
After considering one and other thing, I decided to knit a seamless cardigan. Since the cable pattern is 'happen' anywhere at the fabric, well, I'll do it too! So the project began with a lot of calculation and sketch. I created a pattern for multiple size for you to purchase (I almost drain my brain for this), but this one is custom size. The hardest part is joining the pattern into a large yoke, and I want the pattern to keep continues. I learnt a lot from here. Due to a sudden miscellaneous business (it was before Idul Fitri-two mos go), I could only knit a few rows/ day (literally FEW) and sometimes not at all. Now, two months later, I finished it

After two months this cardigan finally done 

I improvise here and there, also decided to crochet the front opening edge instead of knit it. I don't crochet very well so I need to consulted with my friend for that. Crochet is sturdy, I believe it will be suitable for big button band and neck edging  where the opening is pretty wide.  And I'm happy with the result! This is front post/back post double crochet , and it's good to substitute ribbing.


Do you see the painting at background? My mother painted that herself.

Are you knitting? 
Yes : This pattern will be available soon on ravelry store
No : Ah, I'll be back with knitting tutorial ( I hope soon, in Bahasa)

See you around, HANK

Best warmer regards 

Casting On!

8.01.2013

Alley


Alley is my first seamless top. I created the yoke pattern a few years back but I haven’t found ‘a place’ to knit with the pattern yet…until a few weeks ago.  And I already have a name for this pattern: 4 petals flower with bobbles.

So the story begins. I have a pale pink and a deep red yarns, contrast color is the best to show off a pattern. I was using Elizabeth Zimmerman’s Knitting without Tears as a guide (since this is my first time I didn't plan to knit blindly). It’s true, when knitting seamless from bottom, the body part felt like forever! But the fun and most important part happened at the very last: the yoke. The slightly ruffled effect was accidental, but surprisingly I love it….

When the fabric finished, time to give a name. 4 Petals flower with bobbles yoke top is ridiculously long, so I need to look for something else. Before the name even found, I need a picture to show you all the result. I have some ideas how the picture will be, but considering the situation, we are quite busy right now, finally I end up in an alley not far from home. It’s a small passage behind the main street and surrounded with people’s houses. A series of photo spoiler happened too! A man peeking from behind and he clearly visible in the frame! The pictures are continues so he continually appear.  I need the help of photo processing software to eliminate him from the focus.

see the old man in red?

So this is where the name comes from: Alley, though I would rather imagine I was walking in a path with bushes and flower bed rather than people’s houses. But thanks it didn't happen. If it were flowers, then I’m invisible J
The pattern is available in ravelry for free in limited time, how to customize is included.  Be sure to download it (and knit it). I really want to see yours!
HANK..


CastingOn!

7.19.2013

Green Lantern Earflap Hat


Yes, and it's GREEN, honestly this is my firs hat project
A color work hat requested by my husband. He just wanted the green lantern symbol, and I'm the one who improvised. I don't know this is because the green color, or green lantern itself made him a huge fans of green lantern. All i know, he loves green (as a back up I start to make color chart for other lanterns)

With cotton yarn as the material, this beanie is warm enough but not too hot (as person who live in tropical region, the need of warm headcover is not primary, except if you are frequently hiking or camping on the mountain and sleeping in a tent, but my husband is getting cold easily-i wonder how-so a hat is necessary.
For you who love to knit, the pattern is available for download. Visit my Shop to download it for FREE via ravelry.Or see HERE
HANK! (Have A Nice Knitting--> in case i will use this words latter )


                                                                                                                                   Regards,

                                                                                                                                  CastingOn!


7.02.2013

Drop and Cable Shrug

In warmer day we don't need a bulky yarn to wrap us like a cocoon. It's time for airy pattern. This shrug using drop stitch, elongated stitch and basic cable. A single hank of hand dyed rayon poyeng will be enough for this light, airy and pretty shrug. And it's now available on Ravelry!

Drop and Cable Shrug


Dig your stash, grab your yarn (and needle), and start knitting. Enjoy, yarn lovers!


Best regards,

CastingOn!

5.23.2013

FLOWER AND MORE FLOWERS TO A HAND BAG


One day i was staring at my left over yarns, and after finished a knitted project i want to do something with my crochet hook. I might be  new in knitting world but crochet is even "newer". Using only basic sts, i start hook and hook. There, i have a circle, then a flower ( My husband said i'm obsessed with flowers.  Maybe I do, well, I AM a female), then some flowers.
first circle then added petals

join the flowers on the go


so i have some flowers in the round
At this point i still undecided, what will  I do with these flowers? That was awkward because people who saw my flowers would asks and i would say,"hmm..i don't know (yet)". The next day, I added some greens, at the top, bottoms, and between, also a puff sts for a decoration. Then I knew this is a bag XD.

sc at the top and bottom,add some puff sts and play with chain in between the flowers 
After finished with the "body" of bag, i was looking for something, some fabric that i can use for inside lining  and ended up with my husband's unused t-shirt :) (The rest of the t shirt is now in my trash). I dig my stash box for some other equipments. Using i cord made from sc all rounds i made the handle, and it officially done

Around 11 inch wide, this bag is now my  mother (in law)'s


5.17.2013

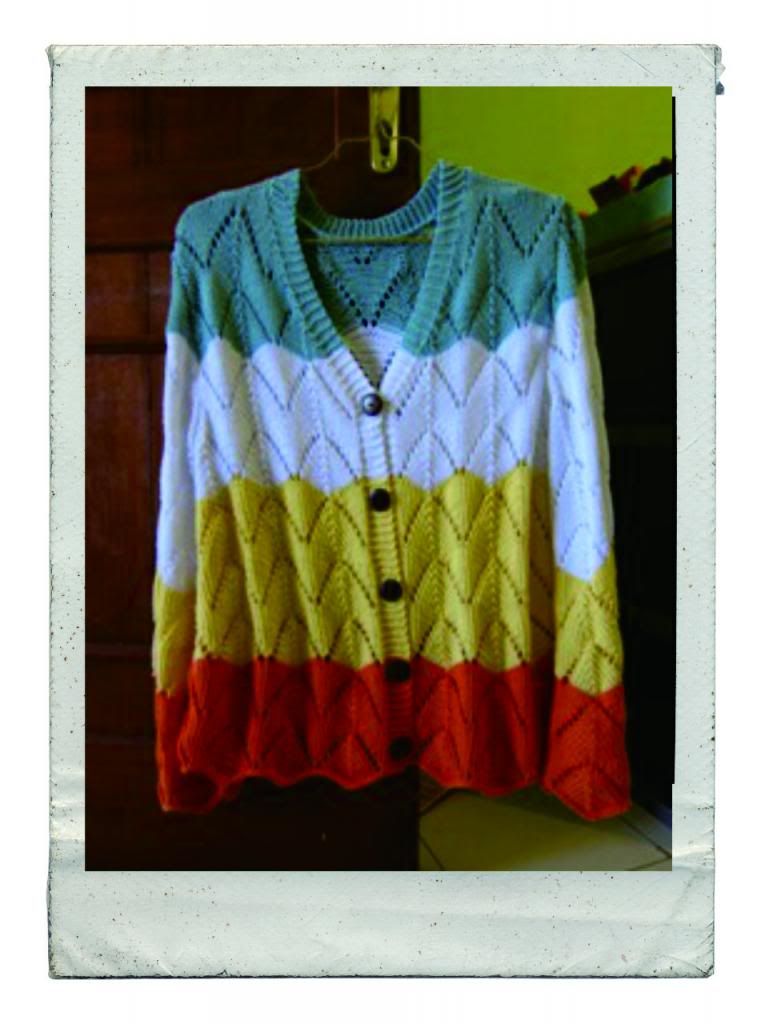
BREEZE LACE CARDI


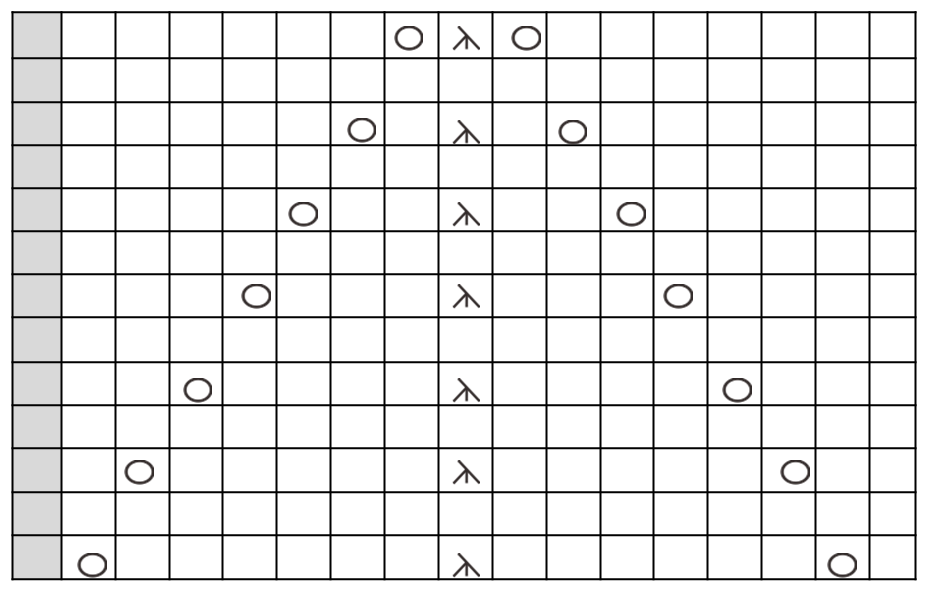
The pattern is easy to memorize, just pay attention to keep the pattern correct while reducing. Please note that I didn’t write the pattern row by row, only the general rule. If there any confusion, ask me.

Material

  • 7 balls ( 2 orange, 2 yellow, 2 white, 1 blue) of mercerized       cotton yarn, 100g each (sorry, I have no idea about the length, and you can use your own color choice, even a single color is no problem)
  •  Pair of 4 mm (US 6) needle
  • 5 buttons (1 inch diameter) 

Gauge
2 pattern repeat = 17 cm

         Pattern multiple of 16+1
    
          = Slip 1, K 2 tog, passed slip stitch over (SK2P)
      = Yarn Over (YO)
   = Knit at RS purl at WS

Back
Cast on 131
P 2 rows
K1, pattern 8 times, k1
Next and every WS: k1, purl to last 1 st, k1
Reduce 1 st at each edge
From now work in pattern while reducing every 5 rows until 16 sts have been reduced for each edge
Work even until piece measured 38 cm (or longer if you like), end at WS row  (99 sts)

Shape armhole
RS : BO 6 sts at the beginning of next 2 rows
Next row (WS) : red 1 st each side every alt row 3 times
Work even until armhole measure 15 cm end at RS
Next (WS)  shape back neck : k1, p24, BO center 31, p24, k1
Work shoulder one at time, keep pattern correct and red 1 st at neck edge every alt row 3 times.
Work even until armhole measure 20 cm, end at RS

Shape shoulder
Next (WS) p12, turn
Next (RS) knit across , place on a holder (21 sts)

Left Front
CO 73
Purl 2 rows
Next (RS) k1, pattern 4 X, k8
Next (WS) k7, p to last 1 st, k1
The gs edge (which is consist of 7 sts), is the button band. Reduce  1 st at the opposite edge every 5 rows as back
While keeping the pattern correct , keep reducing until 16 sts have been reduced.
Work even until piece measure = back (57 sts)

Shape armhole and neck opening
With RS facing BO 6 sts at the beginning of row
Next : k7, p to last 1 st, k1
Red 1 st at armhole edge for next and the following alt row
Work even
Red armhole edge once more and at the same time red 1 st before button band for front neck shaping.
Work even at armhole edge while reducing neck edge 18 x more.  (27 sts)
Work even until piece measure = back, shape shoulder with WS facing
Place on a holder
Place marker for 5 button spaced evenly

Right Front
Work as left with reverse shaping. Work buttonhole at correspondence marked area
To make buttonhole: (Noted that the sts showed here represent only the button band area)
Work buttonhole with WS facing, k2, BO 2 sts, k3
Next (RS) k3, CO 3 sts, K2
After this row there are 8 sts at button band
Next : k2, k2tog, k4

Sleeves
CO 69
Purl 2 rows
K2, work pattern 4 times, k3
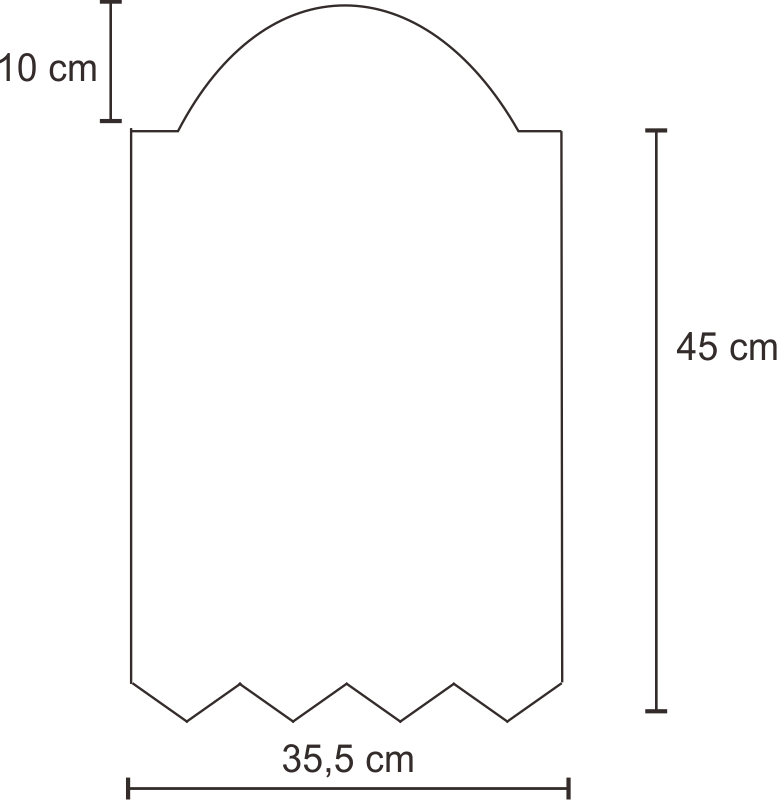
Work even until piece measures approx 45cm, end at RS
Next (WS) BO 6 sts at beg next 2 rows
Work 5 rows even
Red 1 st each side every row until there are 19 sts left
BO

To Make Up
Join shoulder using 3 needle BO
BO 20 sts at back and front, BO 1 st at back, left remaining 8 sts button band on needle
Work one side of button band in gs (you choose, right or left front) and seam along back neck edge
Finished by grafting to the other side of button band
Sew sleeves and side seam.

Approximate finished measurement
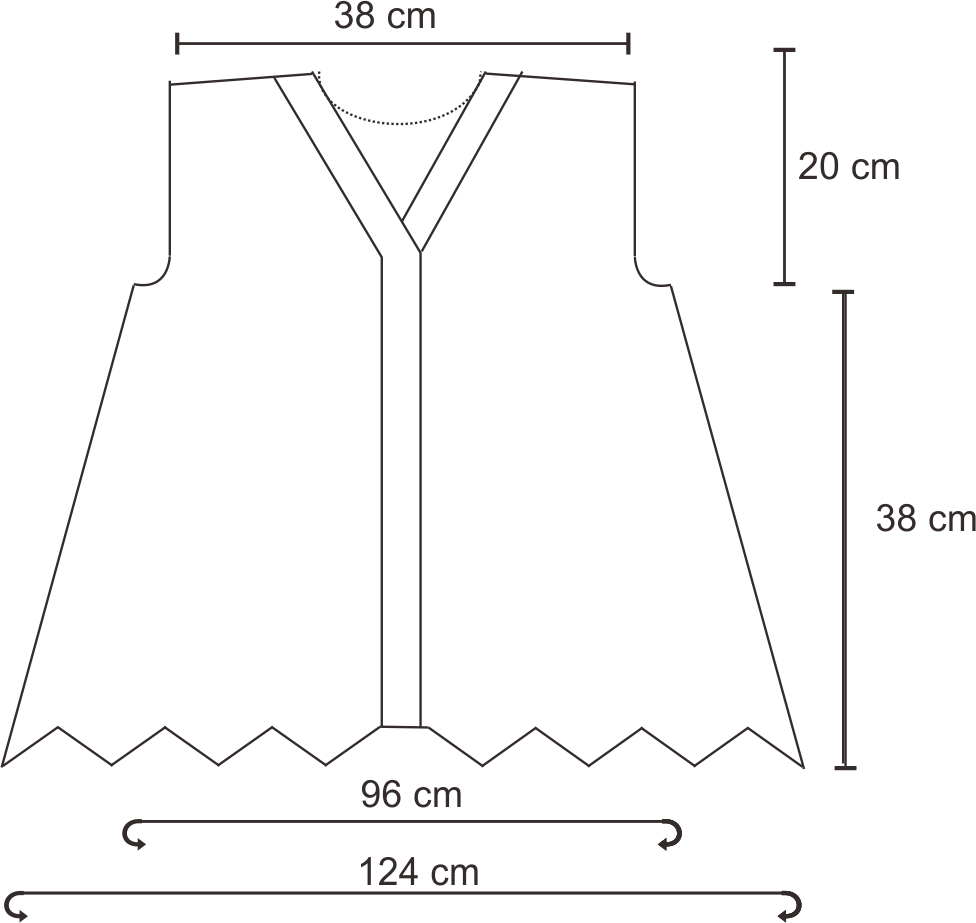
          Back/ Front                                          Sleeves


If you find any error contact me, thank's!

5.16.2013

Bind Off

Bagaimana jika sudah selesai merajut? Bind off (BO) adalah cara untuk mengakhiri rajutan (seperti halnya bahasas inggris yang ada US ada British, terminologi dalam merajut juga ada British ada US. Bind off itu US therminology, kalau terminologi Britishnya Cast off.

5.15.2013

Purl Stitch


Tusuk purl atau purl stitch adalah kebalikan dari knit stitch. Jika dalam knit stitch posisi benang ada di  belakang, pada purl stitch posisi benang ada di depan. Sama seperti knit stitch, purl stitch dapat dilakukan baik Continental maupun English Method


5.14.2013

Knit Stitch

Ada dua tusuk dasar dalam merajut, tusuk knit atau knit stitch dan tusuk purl atau purl stitch. Variasi dari kedua tusuk ini bisa membuat berbagai macam pola. Dalam pola knit disingkat k dan purl disingkat p.

5.13.2013

Cast On

Cast On merupakan tusuk dasar dalam merajut. Ada banyak cara melakukan CO, dsini kita akan belajar dua diantaranya. Jika dalam sebuah pola tidak disebutkan secara spesifik metode CO yang diperlukan, maka kita bebas menentukan sendiri metode yang kita suka.

5.12.2013

Slip Knot

Slip knot adalah simpul pertama dalam rajutan. Tidak hanya merajut, merenda juga membutuhkan slip knot. Slip knot merupakan awalan sebelum kita bisa membuat tusuk dasar