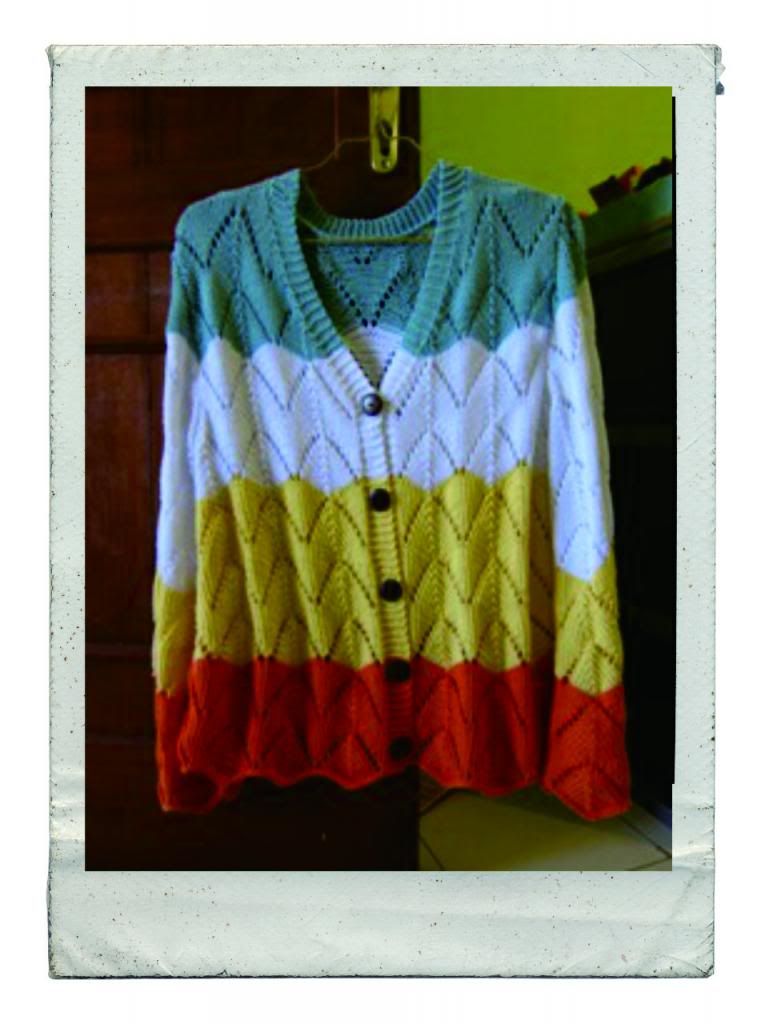
The pattern
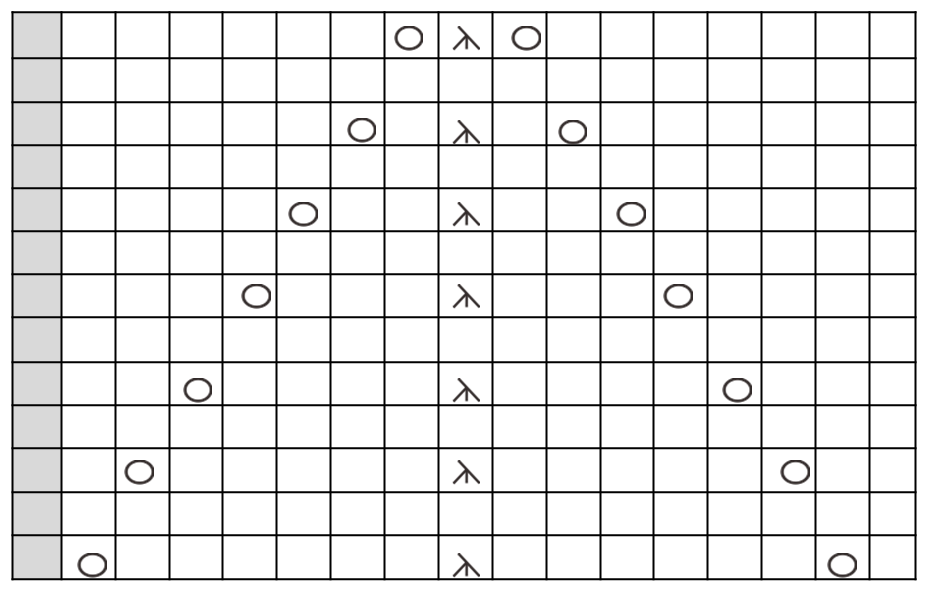
is easy to memorize, just pay attention to keep the pattern correct while
reducing. Please note that I didn’t write the pattern row by row, only the
general rule. If there any confusion, ask me.
Material
- 7
balls ( 2 orange, 2 yellow, 2 white, 1 blue) of mercerized cotton yarn, 100g
each (sorry, I have no idea about the length, and you can use your own color
choice, even a single color is no problem)
- Pair
of 4 mm (US 6) needle
- 5
buttons (1 inch diameter)
Gauge
2 pattern repeat = 17 cm

= Slip 1, K 2 tog, passed slip
stitch over (SK2P)

=
Yarn Over (YO)

= Knit at RS purl at WS
Back
Cast on 131
P 2 rows
K1, pattern
8 times, k1
Next and
every WS: k1, purl to last 1 st, k1
Reduce 1 st
at each edge
From now
work in pattern while reducing every 5 rows until 16 sts have been reduced for
each edge
Work even
until piece measured 38 cm (or longer if you like), end at WS row (99 sts)
Shape armhole
RS : BO 6
sts at the beginning of next 2 rows
Next row (WS)
: red 1 st each side every alt row 3 times
Work even
until armhole measure 15 cm end at RS
Next
(WS) shape back neck : k1, p24, BO
center 31, p24, k1
Work
shoulder one at time, keep pattern correct and red 1 st at neck edge every alt
row 3 times.
Work even
until armhole measure 20 cm, end at RS
Shape shoulder
Next (WS)
p12, turn
Next (RS)
knit across , place on a holder (21 sts)
Left Front
CO 73
Purl 2 rows
Next (RS)
k1, pattern 4 X, k8
Next (WS)
k7, p to last 1 st, k1
The gs edge
(which is consist of 7 sts), is the button band. Reduce 1 st at the opposite edge every 5 rows as
back
While
keeping the pattern correct , keep reducing until 16 sts have been reduced.
Work even
until piece measure = back (57 sts)
Shape armhole and neck opening
With RS
facing BO 6 sts at the beginning of row
Next : k7,
p to last 1 st, k1
Red 1 st at
armhole edge for next and the following alt row
Work even
Red armhole
edge once more and at the same time red
1 st before button band for front neck shaping.
Work even
at armhole edge while reducing neck edge 18 x more. (27 sts)
Work even
until piece measure = back, shape shoulder with WS facing
Place on a
holder
Place
marker for 5 button spaced evenly
Right Front
Work as
left with reverse shaping. Work buttonhole at correspondence marked area
To make buttonhole: (Noted that the sts showed here represent only the button band
area)
Work buttonhole with WS facing, k2, BO 2 sts, k3
Next (RS)
k3, CO 3 sts, K2
After this
row there are 8 sts at button band
Next : k2,
k2tog, k4
Sleeves
CO 69
Purl 2 rows
K2, work
pattern 4 times, k3
Work even
until piece measures approx 45cm, end at RS
Next (WS)
BO 6 sts at beg next 2 rows
Work 5 rows
even
Red 1 st
each side every row until there are 19 sts left
BO
To Make Up
Join
shoulder using 3 needle BO
BO 20 sts
at back and front, BO 1 st at back, left remaining 8 sts button band on needle
Work one
side of button band in gs (you choose, right or left front) and seam along back
neck edge
Finished by
grafting to the other side of button band
Sew sleeves
and side seam.
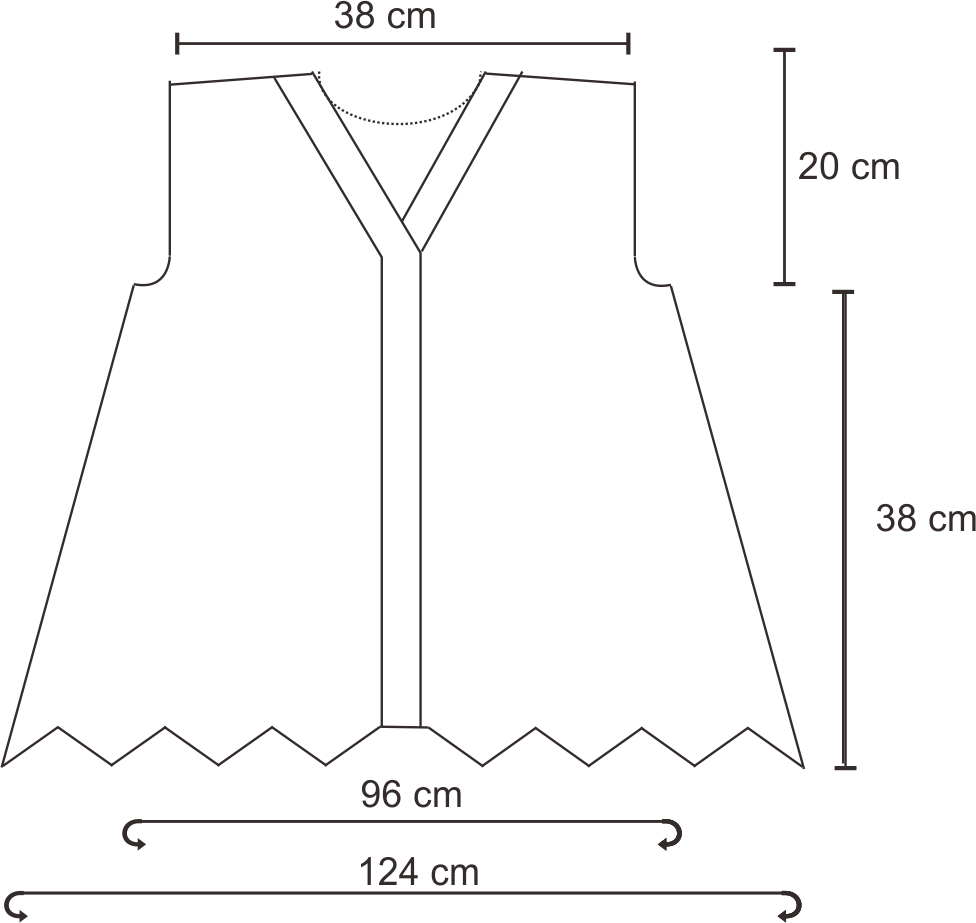
Approximate
finished measurement

 Back/ Front Sleeves
If you find any error contact me, thank's!